Having a Facebook page for your business is becoming one of those ‘norms' in business–clients and customers expect it. Why is having a Facebook page a good idea? It can serve as a forum to listen to your customers, get feedback on products  or services, offer insightful tips (or links to blog posts with those tips), and help you keep the pulse of your consumer. It's merely a platform to engage your customers and potential customers–and as with any tool, it's only as good as its application.
You have to have a personal Facebook Profile in order to create a page. Upon creating a page, you're asserting that you are the official representative of your business, non-profit, or entity.
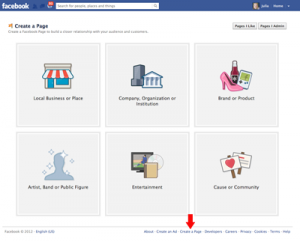
Step One: Log on to Facebook with your personal profile, click on your personal profile page. Scroll all the way to the bottom right side of the page and click “Create A Page.” You'll be taken to a screen where you'll choose your page type. See screenshot below.
Step Two: Once you choose whether you're a local business, company, brand/product, band, celebrity, entertainment or community/cause, click on that icon box to get a drop down menu. In the case of a local business, you'll be asked to complete some basic information and accept Facebook's terms of use.
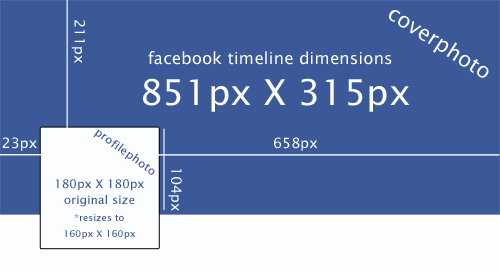
Step Three: You can upload a business profile photo if you wish at this time. Your profile photo should be 180 pixels x 180 pixels. It will fit best if you size your logo and leave a 20 pixel margin so the smaller photo in your newsfeed won't be chopped off.
Step Four: Under the next step called “Get Fans,” you'll also have the option to share your page with your Facebook friends list and email contact lists. You can also do this later if you choose, once your page is set up.
Step Five: Enter your basic information in this area. Your description should be a short concise sentence on your product or service offering. Spend some time on this section and fill it out completely.
Now you're all set! For your timeline photo, it should be sized 851 pixels wide x 315 pixels tall. The profile photo will overlap the cover photo. Use the image below as a guide. (Note: this image is not to scale)
Finally, be aware that there is a restriction on your cover photo for business. Cover image may not include images with more than 20% text.


